HacktheBox Re-Coded
“The difference between professionals and Script Kiddies is the difference merely between using other people’s tools and writing your own” - Charlie Miller
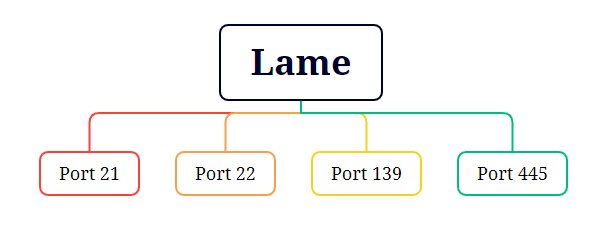
Lame Codeup

Recon/Scanning
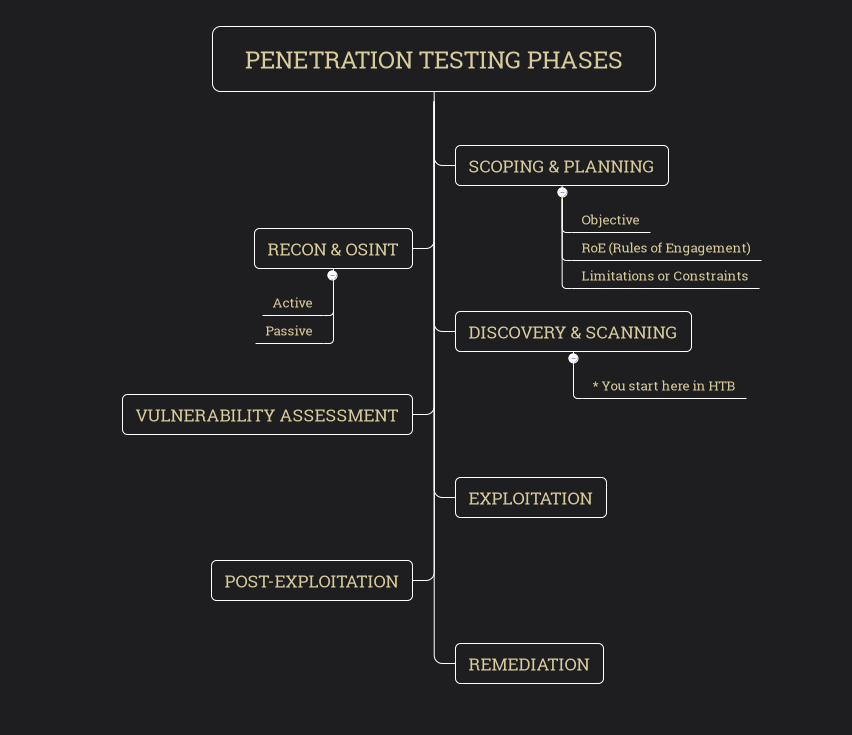
For ethical hackers and pentesters, reconnaissance is undeniably one of the most crucial phases (if not THE most important), as proper enumeration can be the key to successfully penetrating a system or network. However, with HTB/THM, the true recon part is somewhat simplified, and we often dive straight into the Scanning phase. One of the most common forms of this is Port Scanning.
To get into the swing of things, let’s create a ping tool to ensure our target is alive. Later down the road, we’ll delve deeper into the Internet Control Message Protocol (ICMP) to gain a better understanding and its use. It’s important to note that most machines on HTB/THM and in the real world have ICMP disabled, so eventually, we will need to find alternative methods to bypass this restriction to ensure our target is alive.
If you ask anyone that knows me, my teaching method is pretty straightforward! If you can’t swim, I’ll throw you in the deep end. This is no different. We are going to start with concepts you may or may not be familiar with—just hang tight. Everything will be covered. Also, you have ChatGPT these days! AI is moving quickly. Open up pinger.py and let’s code…
#!/usr/bin/env python3

import os  # OS interface (e.g., get process ID).
import socket  # Networking interface (e.g., create sockets).
import struct  # Byte manipulation (e.g., pack/unpack data).
import select  # I/O multiplexing (e.g., wait for I/O).
import sys  # System-specific parameters (e.g., command line args).
import time  # Time functions (e.g., sleep, measure time).


# Calculate checksum for the given data
def checksum(data):
    # If the length of the data is odd, append a null byte to make it even.
    if len(data) % 2 != 0:
        data += b'\x00'

    # Initialize the checksum_value to 0.
    checksum_value = 0

    # Iterate through the data two bytes at a time.
    for i in range(0, len(data), 2):
        # Combine two bytes into a 16-bit value and add it to the checksum_value.
        checksum_value += (data[i] << 8) + data[i+1]

    # Add the carry bits (if any) to the lower 16 bits to the higher 16 bits.
    checksum_value = (checksum_value >> 16) + (checksum_value & 0xffff)

    # Add the carry bits (if any) to the higher 16 bits.
    checksum_value += checksum_value >> 16

    # Take the one's complement (bitwise NOT) of the checksum_value and keep only the lower 16 bits.
    return ~checksum_value & 0xffff


# Create a raw socket
def create_socket():
    try:
        # Create a raw socket using the socket() function with the following parameters:
        # - socket.AF_INET: Address Family (IPv4)
        # - socket.SOCK_RAW: Socket Type (Raw socket, which allows access to lower-level protocols)
        # - socket.IPPROTO_ICMP: Protocol (ICMP - Internet Control Message Protocol)
        sock = socket.socket(socket.AF_INET, socket.SOCK_RAW, socket.IPPROTO_ICMP)

        # Set socket option SO_REUSEADDR to 1 (True) to allow reusing local addresses.
        # This is useful in case the socket is closed but its port is still in a TIME_WAIT state.
        # It allows the socket to be reused immediately without waiting for the TIME_WAIT to expire.
        sock.setsockopt(socket.SOL_SOCKET, socket.SO_REUSEADDR, 1)

        # Return the created socket object.
        return sock
    except socket.error as e:
        # If there is an error during socket creation, handle it by printing an error message.
        print(f"Socket creation failed: {e}")
        return None

# Function to send an ICMP echo request
def send_ping_request(sock, dest_ip, seq_num, timeout):
    # ICMP header fields
    icmp_type = 8  # ICMP type 8 = Echo Request
    code = 0
    checksum_value = 0
    identifier = os.getpid() & 0xffff  # Generate a unique identifier for this request based on the process ID

    # ICMP payload (data)
    payload = b'Hello, World!'  # Change this as needed. This is the data sent along with the request.

    # Create ICMP header
    icmp_header = struct.pack('!BBHHH', icmp_type, code, checksum_value, identifier, seq_num)

    # Calculate the checksum for the ICMP header and payload
    checksum_value = checksum(icmp_header + payload)

    # Create final ICMP packet by including the calculated checksum
    icmp_packet = struct.pack('!BBHHH', icmp_type, code, checksum_value, identifier, seq_num) + payload

    # Send ICMP packet to the destination IP address
    try:
        sock.sendto(icmp_packet, (dest_ip, 0))
    except socket.error as e:
        print(f"Socket error while sending packet: {e}")
        return

    # Wait for the response within the specified timeout period
    start_time = time.time()
    ready = select.select([sock], [], [], timeout)
    if ready[0]:
        # Receive the ICMP response and get the sender's address
        response, addr = sock.recvfrom(1024)

        # Calculate the elapsed time since the request was sent to measure the round-trip time (RTT)
        elapsed_time = (time.time() - start_time) * 1000

        # Print the received ICMP response and the elapsed time
        print(f"Received ICMP response from {addr[0]} in {elapsed_time:.2f}ms")
    else:
        # Request timed out if no response received within the timeout period
        print("Request timed out")


# Main function
def main():
    dest_ip = sys.argv[1] # This is a way of using arguments in your programs
    timeout = 1  # Timeout value in seconds
    num_pings = 4  # Number of pings to send

    # Create a connection
    sock = create_socket()
    # This is our socket object, if it is not None do work
    if sock:
    	# Iterate through our num_pings count
        for seq_num in range(num_pings):
            print(f"Pinging {dest_ip} with ICMP sequence number {seq_num+1}")
            send_ping_request(sock, dest_ip, seq_num+1, timeout)
            time.sleep(1)  # Wait for 1 second between pings
        sock.close()


# We shall touch on this later
if __name__ == '__main__':
    main()
Does this look intimidating? Don’t worry—this is just an example of the power behind Python, and we’re going to utilize it! Soon I’ll show you the true power behind code and other languages! Speaking of power…
An essential concept to discuss at this juncture is the checksum, particularly its critical role in the realm of Socket Programming, with an emphasis on Raw Sockets. Employing checksums in conjunction with sockets is pivotal for ensuring data integrity, facilitating error detection, and sustaining a reliable communication channel across networked devices.
Essentially, the checksum involves a straightforward mathematical operation applied to the data prior to its transmission, with the resultant checksum value being attached to the data packet. Upon receipt, the destination device executes an identical checksum computation and compares this outcome with the received checksum value. A match between these values typically signifies that the data has remained unaltered during transit; a discrepancy, however, may indicate potential data corruption.
As an experimental suggestion, consider temporarily omitting the checksum code to observe the outcome. Was the transmission successful, or did your router reject the packet? This raises an intriguing question: what implications could arise from manipulating packets in the absence of a checksum? We shall explore this question further in due course.

Testing our pinger shows that Lame is active. We now know the machine is alive and ready to be scanned. Nmap does exactly this—it uses ICMP, TCP, UDP, and other protocols to see if the host is up. We will touch upon those protocols later on. Something worth mentioning! ICMP and many other protocols require sudo rights. In order for ping to work, it needs to create a RAW socket. This is normally a privileged action, so sudo is required. We work within Linux, not Windows.
Let’s switch to Port Scanning. A port scanning tool is equipped to probe a host/server for open ports. A port is a virtual point where network connections start and end. Normally each port has a default process/service associated to it. For instance, 22 usually has the SSH (Secure Shell) service running but you can run any service on any port you wish. The port will respond with either Open, Closed or Filtered.

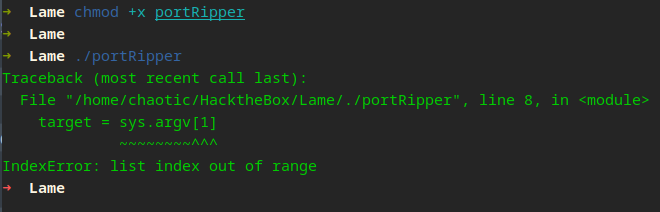
Depending on the response back, it will indicate whether or not the port is ready for a connection. Let’s create our port scanner to demonstrate. We are going to step back a little and slow down to touch upon something important when programming! Code up portRipper…
#!/usr/bin/env python3

import sys
import socket
import time

# take in as args - target,
# starting and ending port
target = sys.argv[1]
s_port = int(sys.argv[2])
e_port = int(sys.argv[3])


def portScanner():  # Port scan function
    # Record the start time of the scan
    start_time = time.time()

    # Loop between start and end ports
    for i in range(s_port, e_port):
        # Create socket object, set timeout and connect
        sock = socket.socket(socket.AF_INET, socket.SOCK_STREAM)
        sock.settimeout(0.50)
        conn = sock.connect_ex((target, i))

        """
        Since we used connect_ex, returned
        will be an error instead of exception
        0 = open & 1 = closed
        """
        if conn == 0:
            print(f"[*] Port: {i:<4} is open")  # Print ports evenly
        else:
            pass  # Pass on closed ports

        sock.close()  # Close connection

    # Record the end time of the scan
    end_time = time.time()
    # Calculate the time elapsed and display it
    elapsed_time = end_time - start_time
    print(f"\nScan completed in {elapsed_time:.2f} seconds.")


# Don't worry, we will touch on this...
if __name__ == '__main__':

    if len(sys.argv) != 4:
        print("Usage: python portScanner <target> <Starting Port> <Ending Port>")
        sys.exit(1)

    portScanner()
Our scanning tool serves the purpose of port scanning, focusing on identifying open ports within the specified range. For now, we won’t obtain detailed information about the running services, which would typically be available through tools like nmap or masscan. Instead, our primary objective is to measure performance using the time module to highlight something key!
You may have noticed that I do not run python before running each tool. Wonder why that is? The shebang, also known as a hashbang, is the symbol sequence “#!” that appears at the beginning of a script or file, which is basically the path to the interpreter that should be used to execute the script. So for our case, the shebang line tells the system to use the “python3” interpreter located in the “/usr/bin/env” directory to execute the script. This also works with extensions—we can remove the .py if we have a shebang in place. Mental Note: I will not always show the shebang in the provided code output to reduce it by one line… but remember it’s always there!
Here we are utilizing the sys module, which allows us to work with command-line arguments for our programs. Command-line arguments are a way to pass information to a script when it is executed. This enables us to make our program more versatile and reusable, as we can provide different inputs without having to modify the code itself. However, working with command-line arguments introduces the possibility of errors, such as the IndexError.
An IndexError occurs when we try to access an element from a list or array using an invalid index—i.e., an index that does not exist in the list. This likely means that our program expects certain command-line arguments to be present, but they are missing or not provided in the correct format.
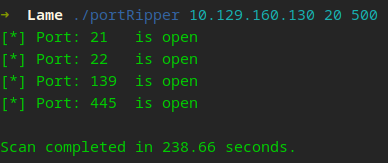
Awesome, it worked! We found a few ports open and it only took less than 5 minutes, but wait… 5 minutes for 480 ports? Nmap/Masscan can do that in seconds! That’s a significant performance difference. Soon I will introduce another Python module—argparse—allowing us to pass in our arguments more effectively, but first!
This is a great time to talk about a concept known as Threading. Threading allows us to concurrently run threads such as tasks/functions for enhanced performance. Threading in Python is a powerful concept that enables the execution of multiple threads (or tasks) concurrently, making it an invaluable tool for I/O-bound tasks where the goal is to perform several operations simultaneously without waiting for one to complete before starting another. So, what would a port scanner with threading look like and how much time would it shave off?
#!/usr/bin/env python3

import sys
import socket
import time
import threading

# take in as args - target,
# starting and ending port
target = sys.argv[1]
s_port = int(sys.argv[2])
e_port = int(sys.argv[3])
threads = []


def portScanner(port):  # Port scan function
    # Create socket object, set timeout and connect
    sock = socket.socket(socket.AF_INET, socket.SOCK_STREAM)
    sock.settimeout(0.50)
    conn = sock.connect_ex((target, port))

    """
    Since we used connect_ex, returned
    will be an error instead of exception
    0 = open & 1 = closed
    """
    if conn == 0:
        print(f"[*] Port: {port:<4} is open")  # Print ports evenly
    else:
        pass  # Pass on closed ports

    sock.close()  # Close connection


def portScannerThreaded():
    # Record the start time of the scan
    start_time = time.time()

    # Loop between start and end ports
    for port in range(s_port, e_port):
        # Create a thread for each port and start it
        thread = threading.Thread(target=portScanner, args=(port,))
        thread.start()
        threads.append(thread)

    # Wait for all threads to finish
    for thread in threads:
        thread.join()

    # Record the end time of the scan
    end_time = time.time()
    # Calculate the time elapsed and display it
    elapsed_time = end_time - start_time
    print(f"\nScan completed in {elapsed_time:.2f} seconds.")


# Don't worry, we will touch on this...
if __name__ == '__main__':

    if len(sys.argv) != 4:
        print("Usage: python portScanner <target> <Starting Port> <Ending Port>")
        sys.exit(1)

    portScannerThreaded()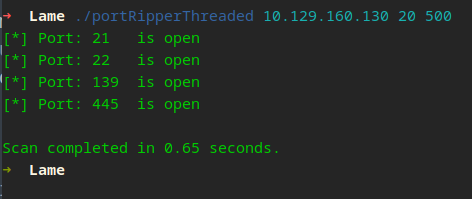
That’s a pretty significant difference! How does this work? What is a thread? A thread is a separate flow of execution. This means that our program will have multiple things happening at once—in our case, scanning ports. We create multiple threads to scan different ports concurrently, significantly reducing the time it takes to complete the scanning process. Each thread handles scanning for a specific range of ports, distributing the workload across multiple threads. This is a very basic example and we can still greatly improve on this concept moving forward. HINT HINT… Multiprocessing!
Now this works great for now, but later we will experience something called the GIL. We will look to other modules to overcome this limitation. Other languages like Functional Programming (Haskell) provide many other ways to address concurrency and parallelism, which we will touch upon in later machines.
This is superb! So far we have found open ports, but what is running on said ports? Behold Banner Grabbing! This technique allows us to gather information about the services running on the open ports. Think of this like a glorified text message. This is not a be-all, end-all tactic; most of the time the socket won’t respond to our simple message. Here is an example—update portRipper with a new function bannerGrabber which will replace our old portScanner function.
def bannerGrabber(port):
    # Create socket object, set timeout and connect
    sock = socket.socket(socket.AF_INET, socket.SOCK_STREAM)
    sock.settimeout(2)
    conn = sock.connect_ex((target, port))

    if conn == 0:
        # If the port is open, grab the banner
        try:
            # Receive up to 1024 bytes of data from the socket
            banner = sock.recv(1024).decode().strip()
            print(f"[*] Port: {port:<4} is open\n    - Banner: {banner}")
        except socket.timeout:
            print(f"[*] Port: {port:<4} is open\n    - Banner not available (timeout)")
        except Exception as e:
            print(f"[*] Port: {port:<4} is open\n    - Error while grabbing banner: {e}")
        finally:
            sock.close()
    else:
        # If the port is closed, skip banner grabbing
        sock.close()
After replacing our portScanner function with our new and improved one we will attempt to grab the banner from each open port. Lastly we will need to update the threaded function to replace the target from the previous function, to our new one!
Change this…

to this…

We need to ensure we update the thread otherwise we will run into an error as the old function no longer exists.
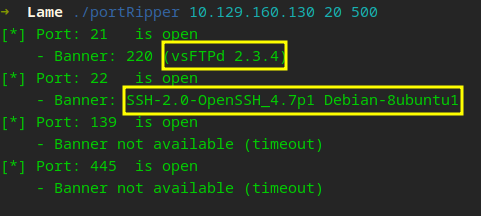
Whoop! We found services and version numbers! This is just from the server sending that data saying “hello, this is what I am serving!” aka the Banner. What is going on with 139/445? Well, let’s get to that—first let us work with port 21.
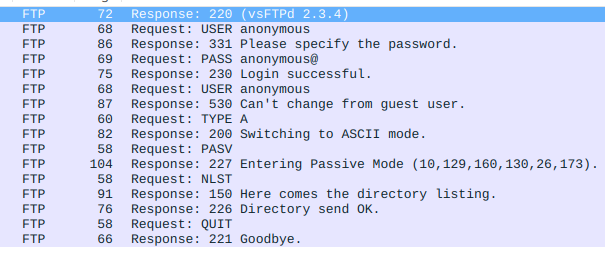
Let’s develop our first Recon Gadget with a focus on FTP. Assuming you have some familiarity with protocols by now, we’ll start with a basic version and enhance it as we encounter more FTP instances. The primary objectives of this gadget are as follows:
#!/usr/bin/env python3

from ftplib import FTP

import sys

def check_anonymous_login(hostname, port=21):
    try:
        ftp = FTP()
        ftp.connect(hostname, port)
        ftp.login()
        ftp.quit()
        return True
    except Exception as e:
        return False

def check_file_listing(hostname, port=21):
    try:
        ftp = FTP()
        ftp.connect(hostname, port)
        ftp.login()
        files = ftp.nlst()
        ftp.quit()
        return files
    except Exception as e:
        return []

def check_upload(hostname, file_path, port=21):
    try:
        ftp = FTP()
        ftp.connect(hostname, port)
        ftp.login()
        with open(file_path, 'rb') as file:
            ftp.storbinary('STOR ' + file_path.split('/')[-1], file)
        ftp.quit()
        return True
    except Exception as e:
        return False

if __name__ == "__main__":
    target_ftp_hostname = sys.argv[1]
    target_ftp_port = 21  # Change this if your FTP server uses a different port

    # Task 1: Check if anonymous login is possible
    anonymous_login = check_anonymous_login(target_ftp_hostname, target_ftp_port)
    if anonymous_login:
        print("Anonymous login is possible.")
    else:
        print("Anonymous login is not possible.")

    # Task 2: Verify if we can view any files on the target FTP server
    files_on_server = check_file_listing(target_ftp_hostname, target_ftp_port)
    if files_on_server:
        print("Files available on the server:")
        for file in files_on_server:
            print(file)
    else:
        print("No files found on the server.")

    # Task 3: Determine whether we can upload files to the target FTP server
    file_to_upload = "path_to_your_file_to_upload.txt"  # Replace this with the file you want to upload
    upload_result = check_upload(target_ftp_hostname, file_to_upload, target_ftp_port)
    if upload_result:
        print("File uploaded successfully.")
    else:
        print("Failed to upload the file.")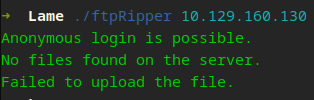
I know this does not look pleasing, we shall improve the output later and add color/formatting. If you look at the above gadget, it works like intended does it not. It solves all the tasks we wanted.
We are going to break the cardinal rule, we can use Wireshark to see what exactly is going on when we run this.
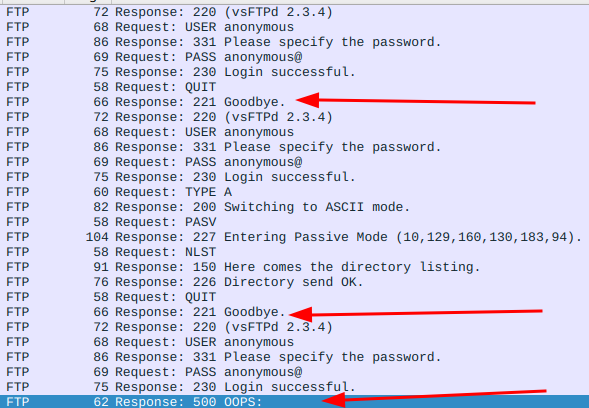
I created a connection for each task, but does it not seem more logical to just connect once, do our tests then close the connection? This is Programmers Logic or the way software developers approach problem-solving and decision-making in the context of programming. This is just a very simple example.
Just for demonstration purposes! This is is more efficient. If we can reduce our “Packet Footprint”, why not. I challenge you to creatively tackle your coding challenges. The code for all this can always be found in the Github
Unfortunately, anonymous access to the FTP server yielded no results, and uploading files was denied. However, we noticed that ports 139 and 445 are open, typically associated with NetBIOS/SMB. Mental note, we are working on a Linux machine so this is probably running Samba. To verify this, we can employ a function in the port scanner script to detect the running status of the NetBIOS/SMB service. If we can at least detect, we can move on from there.
Now is the perfect moment to spotlight a critical concept that will play a pivotal role in our coding journey: Virtual Environments. At first glance, the term might seem like tech jargon, but it simply refers to creating isolated and self-contained environments for our projects.
Adopting virtual environments is not just about organization; it’s a crucial step from a cybersecurity standpoint. Given Python’s versatility, imagine stumbling upon a machine with Python installed where all users have installed modules globally. For us, it might simplify tasks, but it’s a potential headache for the Security Team.
By embracing virtual environments, we ensure our projects are neatly compartmentalized, reducing the risk of cross-contamination between projects and enhancing security. It’s a win-win strategy that bolsters our project management practices and fortifies our security posture.
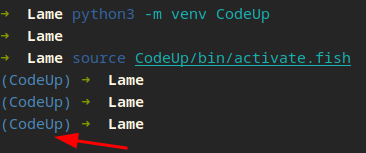
To create one, we can call the module venv with python, then name it whatever you want. You can see after calling the activate (depending on your shell, I use FISH) you will drop into your new env. Now we can install a new module that will help tackle Samba.
pip install pysmb
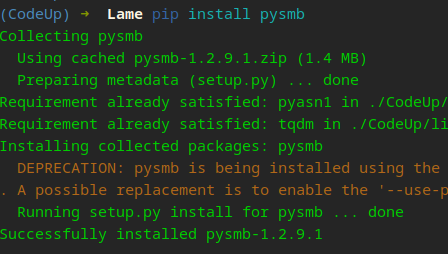
Python’s pip allows us to install 3rd party modules. This is only installed in this env, not globally on our system! pysmb is organized into 2 main packages: smb and nmb. Our updated port scanner should look like this…
#!/usr/bin/env python3

import sys
import socket
import time
import threading
from smb.SMBConnection import SMBConnection
from nmb.NetBIOS import NetBIOS

netbios = NetBIOS()

# Gather target and set port
# works for both 139/445
target = sys.argv[1]
s_port = int(sys.argv[2])
e_port = int(sys.argv[3])
threads = []


def bannerGrabber(port):
    # Check for SMB on port 139 and 445
    if port in [139, 445]:
        smb_detected = smbCheck(port)
        if smb_detected:
            print(f"[*] Port: {port:<4} is open\n    - Unknown version of SMB/NetBIOS Detected!")
        else:
            print(f"[*] Port: {port:<4} is open\n    - Banner not available (timeout)")
        return

    # Create socket object, set timeout and connect
    sock = socket.socket(socket.AF_INET, socket.SOCK_STREAM)
    sock.settimeout(2)
    conn = sock.connect_ex((target, port))

    if conn == 0:
        # If the port is open, grab the banner
        try:
            # Receive up to 1024 bytes of data from the socket
            banner = sock.recv(1024).decode().strip()
            print(f"[*] Port: {port:<4} is open\n    - Banner: {banner}")
        except socket.timeout:
            print(f"[*] Port: {port:<4} is open\n    - Banner not available (timeout)")
        except Exception as e:
            print(f"[*] Port: {port:<4} is open\n    - Error while grabbing banner: {e}")
        finally:
            sock.close()
    else:
        # If the port is closed, skip banner grabbing
        sock.close()


def smbCheck(port):
    """
    Check if an SMB (Server Message Block) service is accessible on a given port.

    This function attempts to connect to an SMB service using an anonymous login. If the connection is successful,
    the function returns True, indicating the service is accessible. Otherwise, it returns False, indicating
    the service is not accessible or an error occurred during connection attempt.

    Args:
        port (int): The port number on which to attempt the SMB connection.

    Returns:
        bool: True if the SMB service is accessible, False otherwise.
    """
    try:
        # Initialize the SMBConnection object with empty strings for username,
        # password, client machine name, and server name for anonymous authentication.
        # This assumes that the SMB service allows anonymous connections.
        conn = SMBConnection("", "", "", "")  # Using anonymous login

        # Attempt to connect to the target SMB service at the specified port.
        # Replace 'target' with the actual hostname or IP address of the SMB server.
        # Note: The 'target' variable needs to be defined outside this function or
        # passed as an argument.
        conn.connect(target, port)

        # After attempting a connection, check if the conn object is valid (True).
        # A True value indicates a successful connection.
        if bool(conn) == True:
            return True

        # Close the connection gracefully if it was established.
        conn.close()
    except TimeoutError as e:
        # If a TimeoutError occurs, it means the connection attempt timed out.
        # This typically happens if the server is unreachable or not responding on the specified port.
        return False
    except:
        # Catch any other exceptions that may occur during the connection attempt
        # and return False. This includes network issues, SMB protocol errors, etc.
        return False


def portScannerThreaded():
    # Record the start time of the scan
    start_time = time.time()

    # Loop between start and end ports
    for port in range(s_port, e_port):
        # Create a thread for each port and start it
        thread = threading.Thread(target=bannerGrabber, args=(port,))
        thread.start()
        threads.append(thread)

    # Wait for all threads to finish
    for thread in threads:
        thread.join()

    # Record the end time of the scan
    end_time = time.time()
    # Calculate the time elapsed and display it
    elapsed_time = end_time - start_time
    print(f"\nScan completed in {elapsed_time:.2f} seconds.")


# Don't worry, we will touch on this...
if __name__ == '__main__':

    if len(sys.argv) != 4:
        print("Usage: python portScanner <target> <Starting Port> <Ending Port>")
        sys.exit(1)

    portScannerThreaded()
Now re-running our port scan…
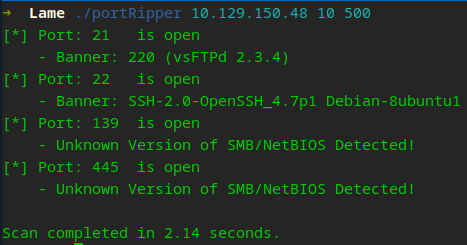
Alright! Alright! Alright! Our scanner returned True which means at least we know what is running. We still need to identify the version! Now we need to work on another Recon Gadget. This on wrapped around the above protocols. This gadget will be a little more sophisticated but we will only create the part to list shares for now.
Later in the series we will break away from using 3rd party modules and strictly use the Standard Library, you will see why as we move along.
smbRipper
#!/usr/bin/env python3

import argparse
from smb.SMBConnection import SMBConnection

# Dialect for SMB1
SMB_DIALECT = 'NT LM 0.12'

class SmbClient(object):
    def __init__(self, ip, sharename):
        # Initialize the SMB client with the IP address and share name
        self.ip = ip
        self.username = ""
        self.password = ""
        self.sharename = sharename

    def connect(self):
        try:
            # Establish an SMB connection to the server
            if self.password is not None:
                # Create an SMBConnection object with credentials for authenticated access
                self.server = SMBConnection(self.username, self.password, '', '', use_ntlm_v2=False, is_direct_tcp=True)
            else:
                # Create an SMBConnection object without credentials for guest access
                self.server = SMBConnection('', '', '', '', use_ntlm_v2=False, is_direct_tcp=True)

            # Set the supported SMB dialects to only SMB1
            self.server.supported_dialects = [SMB_DIALECT]

            # Connect to the SMB server
            self.server.connect(self.ip, 139)

        except Exception as e:
            print(f"An error occurred while connecting to the SMB server: {e}")

    def upload(self, file):
        # Upload a file to the specified share on the server
        data = open(file, 'rb')
        file = '/' + file
        self.server.storeFile(self.sharename, file, data)
        print("File has been uploaded")

    def download(self, file):
        # Download a file from the specified share on the server
        fileobj = open(file, 'wb')
        self.server.retrieveFile(self.sharename, file, fileobj)
        print("File has been downloaded in the current directory")

    def delete(self, file):
        # Delete a file from the specified share on the server
        file = '/' + file
        self.server.deleteFiles(self.sharename, file)

    def list_shares(self):
        # List the available shares on the server
        share_list = self.server.listShares()

        # Filter the shares based on the provided share name
        matching_shares = [share for share in share_list if share.name == self.sharename]

        if matching_shares:
            print(f"Available shares matching '{self.sharename}':")
            for share in matching_shares:

                # Get the file and folder listing for the share
                file_list = self.server.listPath(share.name, "/")

                if file_list:
                    print("Files and folders in the share:")
                    for file_info in file_list:
                        print(file_info.filename)
                else:
                    print("The share is empty.")
        else:
            print(f"No shares found matching '{self.sharename}'. Available shares:")
            for share in share_list:
                print(share.name)


def main():
    # Parse command-line arguments using argparse
    parser = argparse.ArgumentParser(description="SMB Ripper: A simple SMB client to interact with shares.")
    parser.add_argument("ip", help="The IP address of the SMB server.")
    parser.add_argument("-u", "--username", help="Username for authentication.")
    parser.add_argument("-p", "--password", help="Password for authentication.")
    parser.add_argument("-s", "--sharename", default="", help="The name of the share to interact with.")
    parser.add_argument("-ls", "--list-shares", action="store_true", help="List available shares.")
    parser.add_argument("-up", "--upload", metavar="FILE", help="Upload a file to the specified share.")
    parser.add_argument("-d", "--download", metavar="FILE", help="Download a file from the specified share.")
    parser.add_argument("-del", "--delete", metavar="FILE", help="Delete a file from the specified share.")
    args = parser.parse_args()

    # Create an SMB client object with the provided IP and share name
    client = SmbClient(args.ip, args.sharename)

    # Set the username and password for authentication, if provided
    if args.username:
        client.username = args.username
    if args.password:
        client.password = args.password

    # Connect to the SMB server
    client.connect()

    # Perform the requested actions based on the provided arguments
    if args.list_shares:
        client.list_shares()

    if args.upload:
        client.upload(args.upload)

    if args.download:
        client.download(args.download)

    if args.delete:
        client.delete(args.delete)

if __name__ == "__main__":
    main()
You may have noticed something new… A Python Class
A class is a blueprint or a template for creating objects. It defines a set of attributes (variables) and methods (functions) that represent the characteristics and behaviors of objects created from that class.
For example, in our SmbClient class, the attributes ip, username, password, and sharename represent the state or data of each SmbClient object. The methods like connect(), upload(), download(), delete(), and list_shares() represent the behavior or actions that the SmbClient objects can perform. Make sense? We will touch upon this as we continue to create classes, do not worry.
I decided to throw in argparse to replace the sys module we were using earlier. Why did I do this? Well, this library gives us access to easy to write user-friendly command-line interfaces. It provides helpful features for handling arguments and displaying a nice help menu. This improves the aesthetics of our programs and makes them easy to use right from the start.
This Gadget is not fully completed yet, we would need too add the logic for our functions to use everything else, but for now lets see if we can list shares. We will have plenty of time to bring everything else together.
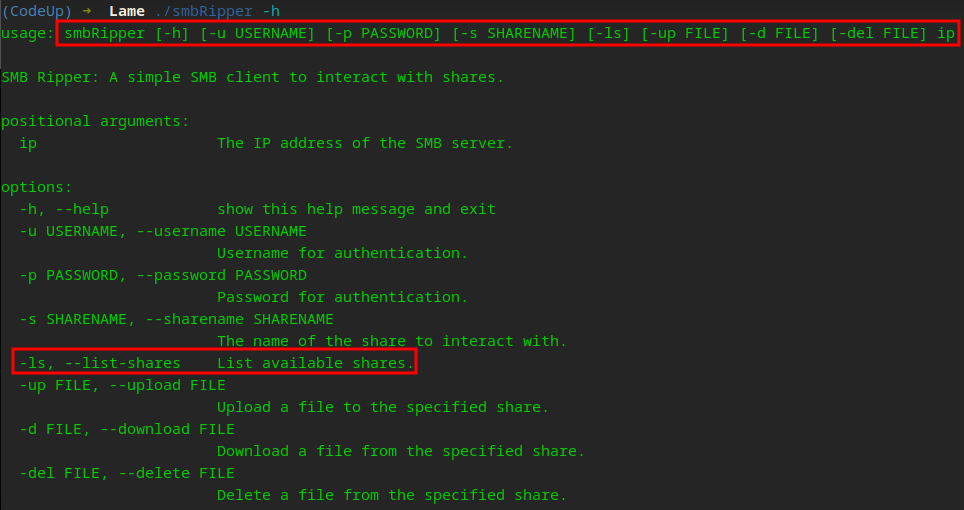
Looking at our help menu for smbRipper…
Lets test and see if we can list anything …
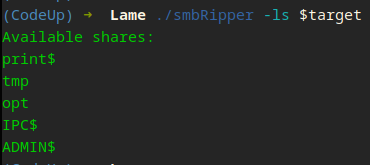
We are getting somewhere… lets look at the tmp and opt shares…
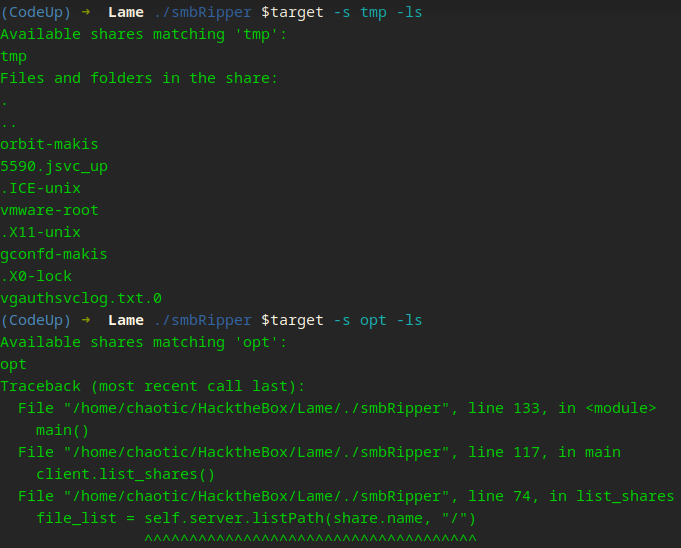
Ruh Roh Raggy!
Did you think you would make it through this without debugging!

This will keep you up late if you enjoy this kind of stuff
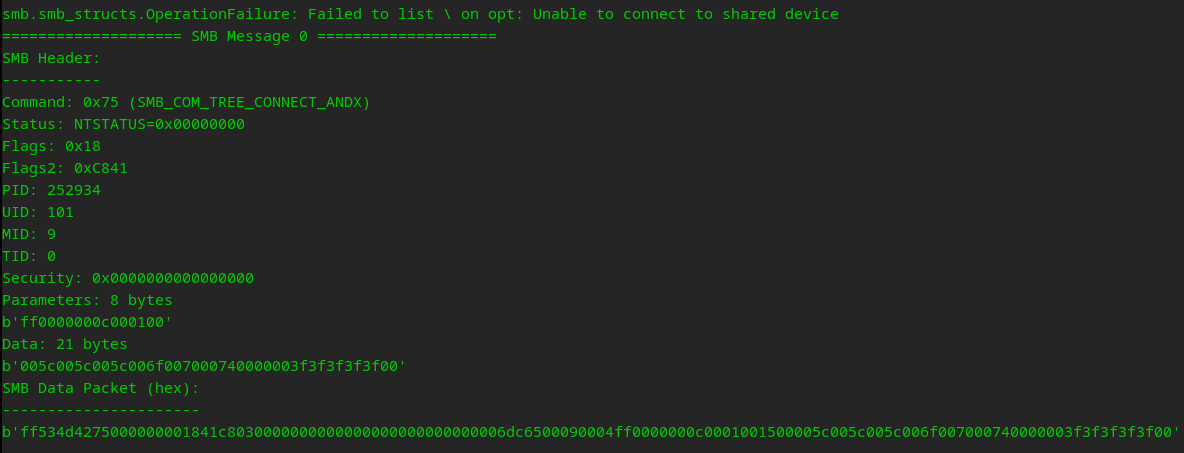
So we can see it did list the contents of tmp but when we tried to list opt, it encoutered an error. We also recv back SMB Messages from the server. We will break this apart down the road.
Error handling is here to help your debugging…

This allows you to gracefully handle unexpected situations or exceptions that may arise during the execution of your code. You can use this to step through your code and figure out which part is not working as intended. You will need to wrap your code in Try/Except statements.
The try block is used to enclose the code that might raise an exception. If an exception occurs within the try block, the program jumps to the corresponding except block to handle the exception. You can have multiple except blocks to handle different types of exceptions, or you can use a more general except block without specifying the exception type to handle any unexpected errors.
def list_shares(self):
            try:
                # List the available shares on the server
                share_list = self.server.listShares()

                # Filter the shares based on the provided share name
                matching_shares = [share for share in share_list if share.name == self.sharename]

                if matching_shares:
                    print(f"Available shares matching '{self.sharename}':")
                    for share in matching_shares:

                        # Get the file and folder listing for the share
                        file_list = self.server.listPath(share.name, "/")

                        if file_list:
                            print("Files and folders in the share:")
                            for file_info in file_list:
                                print(file_info.filename)
                        else:
                            print("The share is empty.")
                else:
                    print(f"No shares found matching '{self.sharename}'. Available shares:")
                    for share in share_list:
                        print(share.name)

            except Exception as e:
                if "Unable to connect to shared device" in str(e):
                    print("Access Denied: You do not have permission to access the shares.")
                else:
                    print(f"An error occurred while listing shares: {e}")
Here I used a general except block to handle our denied access. When we start importing our smbclient class, we will need to update our Exception handling and broaden it.
Too save your brain from having to do all the SMB Negotiations this early on, we can grab the version of Samba running by sniffing the raw data when we list shares. Another module we will use until we understand protocols is Scapy.
A simple sniffer to list all packets and attempt to decode them…
#!/usr/bin/env python3

from scapy.all import sniff
from scapy.packet import Raw

def decode_bytes(raw_data):
    try:
        # Try decoding with UTF-8 (you can change the encoding as needed)
        decoded_data = raw_data.decode('utf-8')
    except UnicodeDecodeError:
        # If UTF-8 decoding fails, fall back to ASCII
        decoded_data = raw_data.decode('ascii', errors='ignore')
    return decoded_data

def packet_handler(packet):
    if packet.haslayer('Raw'):
        raw_data = packet[Raw].load
        decoded_data = decode_bytes(raw_data)
        print(f"Raw bytes: {raw_data}")
        print(f"Decoded bytes: {decoded_data}\n")

if __name__ == "__main__":
    interface = "tun0"  # Replace this with your actual VPN interface name

    try:
        print(f"Sniffing packets on {interface}...\n")
        sniff(iface=interface, prn=packet_handler, store=False)
    except KeyboardInterrupt:
        print("\nPacket capture stopped.")
We have plenty of time to build our tools! We can also see from the response in WireShark it has the version. Take a look your SMB packet…
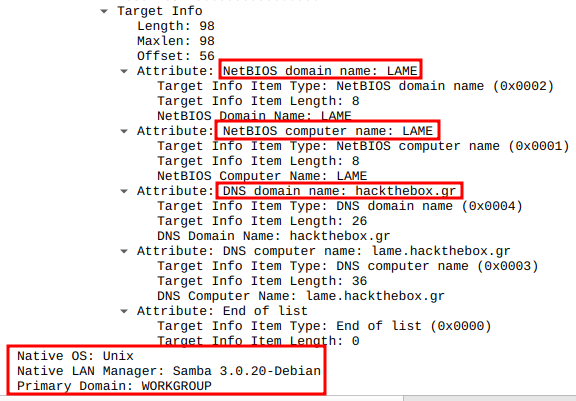
You can see lots of other useful information that we should want to grab as we improve. Using tools like WireShark/Burp to see behind the curtains will most certainly help improve your coding technique.
With known versions we typically want to see if any known exploits exist, other hackers can save us valuable time and its exploit code so it fits right into what we are doing here.
At some point I want to create a similiar tool like searchsploit but with a twist. For now Google is your friend! FTP has a vulnerability but testing it proves no success. Samba has a vulnerability that does work, lets dive into this exploit.
Gaining Access
We have exploit code to gain a shell on the system. CVE-2007-2447 “allows remote attackers to execute arbitrary commands via shell metacharacters involving the (1) SamrChangePassword function, when the”username map script” smb.conf option is enabled, and allows remote authenticated users to execute commands via shell metacharacters”.
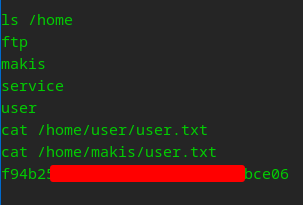
We know we need to use ` to espace in our username. Alright, fire up your listener…
While we are going to recreate netcat in the form of our own tool netbear, it is not in the scope of this first machine, we already have enough code so let use our own tools to exploit and just use netcat for now.
For the exploit to work, we need to authenticate, send our exploit as the username and we just so happen to already have a way to authenticate with SMB, smbRipper.

We are root!
Privilege Escalation
This will be the easiest priv esc in the series ;)
Wrapping Up
We made it through! Whew, that wasn’t so bad!
During our journey through our first CodeUp, we began by understanding the critical Reconnaissance phase. Proper enumeration played a pivotal role in the success of system penetration.
To enhance our scripting capabilities, we explored the significance of the shebang, which allows us to specify the interpreter for script execution. Utilizing the “sys” module enabled us to work with command-line arguments, making our programs more versatile. While threading proved to be a powerful technique, enabling concurrent task execution and reducing scanning time in a port scanner, we also may encounter potential limitations with the Global Interpreter Lock (GIL).
Delving deeper, we learned about Banner Grabbing—a method to gather information about services running on open ports, aiding in the identification of versions and services.
Our hands-on experiment commenced with creating our first Recon Gadget, focusing on FTP. Throughout the process, we emphasized the importance of logical thinking before coding. While multiple solutions may exist for the same problem, it is crucial to consider efficiency in choosing the best approach.
Understanding the value of isolated and self-contained environments for projects, I mentioned Virtual Environments. By avoiding global module installations on shared systems, virtual environments offered us a secure solution.
In furthering our skills, we introduced our first class—a smbclient. As we progress, we plan to explore the significance of code reuse by importing our own modules. Emphasizing the importance of debugging, we realized that it serves as a helpful tool to get our code working effectively.
While we could have immediately moved on to creating SMB negotiations and our networking utility, NetBear, we took a step back to showcase the diverse methods available to achieve desired results. Whether through GUI exploration or raw data parsing, there is no right or wrong approach—only a personalized methodology.
In our exploits, we successfully authenticated with a malicious username, allowing us to use smbRipper to send a payload and obtain a shell as root. Although we missed an opportunity for PrivEsc, we look forward to testing our code in future challenges.
With a solid foundation and a commitment to continuous learning, we are ready to tackle more complex ethical hacking and penetration testing scenarios in our upcoming endeavors.
Devel is up next! Get ready to tackle a Windows machine X_X

We will touch more on FTP. Get a chance to work with IIS and Reverse shells!
oh and exploiting Windows kernel functions for PrivEsc
Can’t wait…